Wix is a cloud-based website editor and publishing service that allows to quickly deploy websites with pre-made templates and website elements
Embedding a website visitor IP tracking code by the TraceMyIP.org app is a fairly simple process while using Wix. Although there are some limitations for free Wix users, the below method allows you to quickly add an IP tracker to Wix website pages.
📈 Sign Up now to instantly track website visitors IPs!
Wix.com visitor IP address tracking code installation
TraceMyIP app provides its users with a JavaScript or HTML code that can be embedded into the Wix-built pages to allow collecting personal visitation statistics for Wix.com website builder-produced websites. Note that this method uses “Add Element” functionality of the Wix editor that loads the tracker code via an iframe element, which has a limitation of displaying the actual browser path of landing pages. The landing page data will reflect the actual Wix URLs that contain the website page data. This, however, does not affect the visitor tracker functionality in any other way.Preferred Wix.com visitor tracker code installation procedure for upgraded PREMIUM Wix account users
If you have upgraded your Wix account, you have 2 options to install the tracker code.
- Install the tracker code globally on all pages of your website (best option)
- Login to your Wix account
- Using the menu on the left, click on the Settings link
- At the bottom of the page, find the ADVANCED section and click on the Custom Code block
- Paste your visitor tracker code and set the drop-down menu to “Load on each new page”.
- Select the Place Code in option – Body Start (preferred for reliable tracking) or Body End (footer placement)
- If you need to hide the visitor tracker status icon, you can use the invisible tracking option.
- Utilize a Wix per-page element to embed your tracker code. When you use the “Add Elements” menu, select “Embed Code” and then “Marketing Tools“, you will be able to utilize the “Custom Code” element, which is also suitable to include your TraceMyIP.org tracker on specific pages.
Basic Wix.com visitor tracker code installation procedure for FREE Wix account users
- Generate a visitor tracker code or use the code that was provided to you at the time when you registered your TraceMyIP account
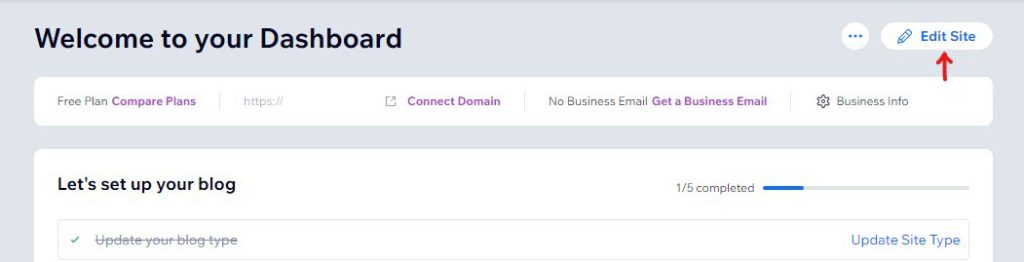
- Login to your Wix.com account and navigate to the dashboard. If you have multiple websites, select the website to which you will be adding the code and click on “Edit Site”
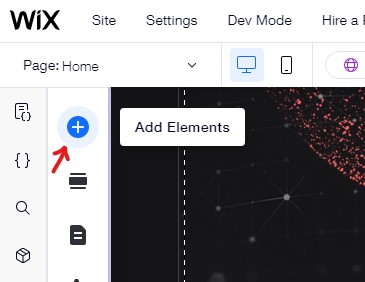
- On the next page, click on the “Add Elements” button to bring up the menu of available elements.
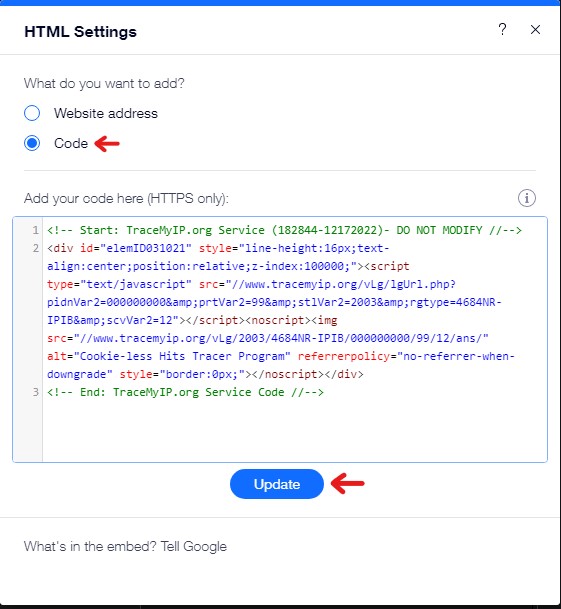
- From the “Add Elements” menu, select “Embed Code” and from “Popular Embers“, click on “Embed HTML“. This will bring up a window for the “HTML Settings“. Select “Code” option and place your TraceMyIP.org visitor IP tracker code into the input box. Then click on the “Update” button at the bottom and close the “HTML Settings” window.
- You can drag this new element to any location on the page where you’d like it to appear.
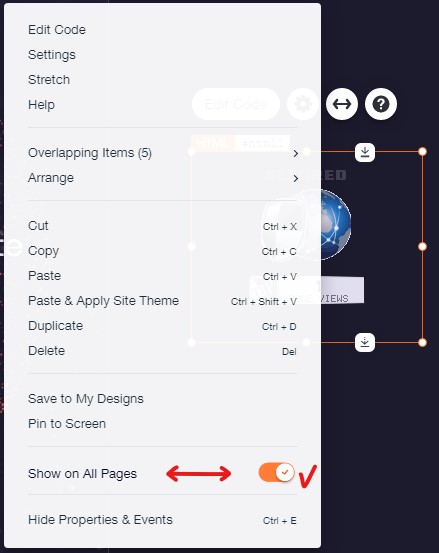
- Now, right-click on the Wix element that you have just added (the visitor tracker icon will now be visible if you have not enabled the invisible tracker icon) and enable the option “Show on All Pages“. This option is an excellent way to ensure that the visitor tracker does not miss any page load activity throughout the entire website.
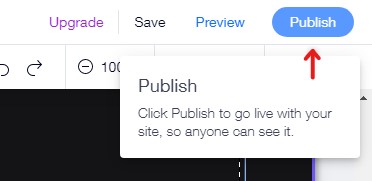
- Now click on the “Publish” button at the top right of the browser window
Confirming the tracker installation
Visit your site and confirm that the tracker icon appears on all pages of your site. If you selectively install the visitor tracker code on individual pages, the tracker is not going to record all visitations to your website. Ensure that the code is also installed on your mobile website template.
If you choose to monitor only individual pages on your website using the same project, utilize the same code and the tracker style on all of your pages. Note that Wix has an implementation for FREE users that partially limits the data that the tracker receives, especially for referrer and landing page URL data.
Concluding the installation
Once you have installed and configured your IP tracker, ensure that it is loaded on ALL pages of your site.
A page header is a preferable location since it will allow the visitors to be detected as soon as the pages are loaded.
If you install the tracker in the footer, it may not work if you have infinite scrolling pages where the content is loaded infinitely as you scroll the pages down. In this case, the tracker code needs to be installed at the top of your pages.
🌍 Who visits your website? Sign Up now to find out instantly!