
This article explains how to set up Campaign Tracker, how it works, and what each setup field means when you create a new advertising campaign in TraceMyIP.
Campaign Tracker is a module inside each TraceMyIP project. It helps you identify which ad campaign, banner, email, feed, keyword, or campaign source brought a visitor to your website by combining a campaign-specific landing page URL with the Website Visitor Tracker installed on your site.
In practical terms, Campaign Tracker gives you a website-side view of your advertising traffic. Instead of looking only at ad-platform reports, you can also see which campaign visits actually reached your tracked pages and examine those visits together with the visitor information available in Website Visitor Tracker.
To start using it, you first need an account and a project in TraceMyIP.
📈 Sign Up now to instantly track website visitors IPs!
What Campaign Tracker does
Campaign Tracker is used to manage and analyze online advertising traffic across one or more campaign providers. Each project can have its own Campaign Tracker entries, and each tracker can be tied to a specific landing page URL and a specific ad or traffic source.
It can be used to:
- create campaign-specific landing page URLs for ads and promotional links;
- see which visitors came from which campaign or advertisement;
- track traffic from paid search, banners, feeds, email, affiliate links, and other link-based ads;
- compare campaign sources in one place instead of relying only on separate provider dashboards;
- associate campaign information with Website Visitor Tracker logs; and
- review campaign-related details that help evaluate ad performance and traffic quality.
The exact information available depends on what you enter into Campaign Tracker and what your ad provider passes through the landing page URL.
How Campaign Tracker works
Campaign Tracker works by generating a specially prepared landing page URL for your ad campaign. When a visitor clicks the ad, banner, email link, feed link, or another promotional link, that encoded landing page URL passes campaign information to TraceMyIP.
When the visitor reaches your website, the Website Visitor Tracker installed on the landing page reads the visit and the campaign-related values available in the URL. TraceMyIP then logs the visit, analyzes the campaign information, and converts it into readable campaign traffic statistics.
The process is simple:
- You create a campaign tracker and generate a landing page URL.
- You place that generated URL into your ad platform as the ad destination.
- A visitor clicks the ad and lands on your website.
- The Website Visitor Tracker logs the visit and reads the campaign values.
- Campaign Tracker organizes that data so you can review campaign statistics and the related visitor activity.
This is why the visitor tracker must be installed on your landing pages. Without the tracker on the destination page, campaign statistics cannot be logged for visits reaching that page.
Before you create a campaign tracker
Set up the following items before you begin:
- Create an account and a project in TraceMyIP.
- Go to My Projects.
- Add a new project if you have not created one yet.
- Choose any Website Visitor Tracker style. The styles differ visually, but the tracking function is the same.
- Install the visitor tracker code on your website.
The tracker should be installed on all pages of your website, especially your advertising landing pages. Installing it in the page header or another site-wide location is the safest approach because it helps ensure the tracker loads consistently across the site.
If you later want to hide the visible tracker, first confirm that it appears correctly on the landing pages. After that, you can enable invisible tracker mode if needed.
Compact setup guide
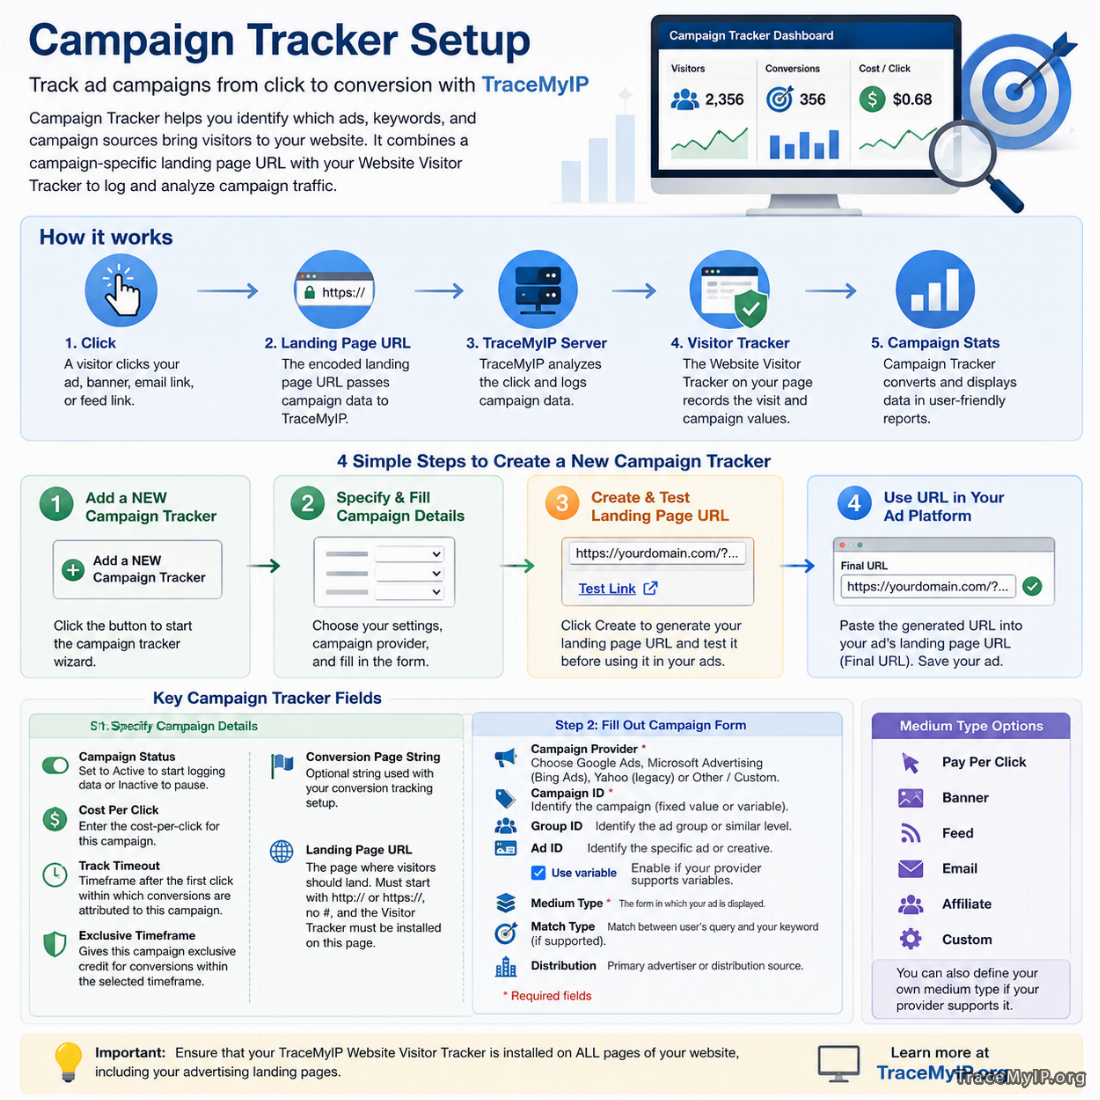 The setup wizard is straightforward. In most cases, you create a new campaign, fill in the campaign details, test the generated URL, and then place that URL into your ad platform.
- Click Add a NEW Campaign Tracker.
- Fill in the campaign fields in Step 1 and Step 2.
- Select Create.
- Use the generated landing page URL in your advertising platform.
- Test the generated link before sending traffic to it.
Do not copy and paste the generated landing page URL directly into your browser just to test it, because that may register your own visit. Use the wizard’s Test Link option instead.
If you later change the ad, campaign structure, or the values you want to track, return to Campaign Tracker and generate a new landing page URL.
Step 1: Specify campaign details
The first step defines the campaign at a project level and identifies the landing page that visitors should reach after clicking your ad.
Project Name
This shows the project the campaign tracker belongs to. Each campaign tracker is created inside a specific project.
Campaign Status
Use this setting to control whether the campaign logs data. Set it to Active to begin logging campaign data immediately. Set it to Inactive to suspend campaign data logging without deleting the campaign.
Cost Per Click
This field can be used to store the cost-per-click value for the campaign. If you do not need to track it in the campaign setup, leave it according to your campaign needs.
Track Timeout
This option defines how long a visitor’s activity continues to be associated with the campaign after the visitor’s first click on the campaign link.
For example, if the timeout is set to one month, a conversion can be logged for that campaign only if the visitor reaches the conversion page within one month after the first click on the campaign link. After the selected period passes, campaign data for that visitor is no longer logged under that campaign unless the visitor clicks the campaign link again, which restarts the timeframe.
This setting is useful for time-sensitive campaigns. It can also be used when you want to stop counting conversions from the same visitor after a defined period or right after the first conversion.
Exclusive Timeframe
This setting gives the campaign temporary exclusive credit for conversions. If the campaign is the first one to bring a first-time visitor to your website, conversions occurring within the selected exclusive timeframe are assigned to that campaign ID even if the visitor is later referred by another campaign before the conversion happens.
This can be useful when you want to preserve credit for the first campaign that introduced a new visitor.
Conversion Page String
Use this field if your conversion tracking setup requires a conversion page string. If your project uses a specific conversion page identifier, enter the value that matches your tracking setup.
Landing Page URL
This is the page visitors should reach after clicking the ad. Choose a page that matches the ad closely. A home page is often too broad, while a focused landing page is usually better for campaign tracking and user relevance.
The landing page URL should:
- start with
http://orhttps://; - not include a hash fragment such as
#; - be a real page on your website where the visitor tracker is installed; and
- ideally remain at 250 characters or fewer for compatibility with browsers and campaign providers.
A TraceMyIP visitor tracker must be installed on this page in order to log campaign statistics.
Step 2: Fill out the campaign form
The second step records the campaign metadata that helps identify the source of each visit. Some fields may already be filled in or hidden depending on the campaign provider you choose.
Fill in the required fields marked with an asterisk. When supported by the provider, some values can be passed dynamically by using variables instead of fixed text.
Campaign Provider
This identifies the ad platform or source sending the traffic. Depending on the current interface version, the dropdown may show older provider names such as Google AdWords, Bing Ads, or Yahoo! Search Marketing. These are legacy labels. In current terminology:
- Google AdWords is now Google Ads.
- Bing Ads and Microsoft adCenter are now Microsoft Advertising.
- Yahoo! Search Marketing is a legacy name. Current Yahoo search advertising traffic is generally associated with Microsoft’s advertising network.
If your provider does not match one of the listed presets, choose Other / Custom when appropriate.
Campaign ID
This identifies the campaign. It can be a fixed value you enter manually or a variable supplied by the ad provider, depending on how your campaign URLs are structured.
Group ID
This field can be used to identify the ad group or similar grouping level used by the campaign provider.
Ad ID
This field identifies the individual ad or creative. In some setups, it can be populated by a variable provided by the campaign source instead of a fixed text value.
Use variable
If your provider supports variable insertion for a field, enable this option where appropriate so the provider can pass a dynamic value rather than a hard-coded one.
Medium Type
This describes the form in which the advertisement is displayed. Presets shown in the interface include:
- Pay Per Click
- Banner
- Feed
- Affiliate
- Custom
You can also define your own value if the provider supports it. This field helps separate traffic by advertising format.
Match Type
This field stores the relationship between the user’s query and your keyword when the provider supports that information. It is mainly relevant for search-based advertising platforms.
Distribution
This identifies the primary advertiser or distribution source in the campaign provider. It can be the provider itself, such as Google, or one of its partner sources when that information is available.
How to finish the setup
After you complete the form and select Create, the wizard generates a new landing page URL. That generated URL is the one you should use in your ad platform.
After the URL is created:
- Use Test Link to verify that the generated URL works correctly.
- Log in to your ad provider and create or edit the ad as usual.
- Paste the generated landing page URL into the ad’s landing page or destination URL field.
- Save the ad and confirm that the landing page opens correctly.
If you are using Google Ads, place the generated URL into the Final URL field. Do not place the TraceMyIP generated landing page URL into the Google Ads Tracking template field.
This distinction is important because the generated TraceMyIP URL is intended to function as the landing page URL for the campaign. If you also use other Google Ads tracking settings such as tracking templates, final URL suffixes, auto-tagging, or ValueTrack parameters, make sure those settings do not overwrite, break, or strip the generated landing page URL.
What Campaign Tracker can show
Campaign Tracker works with the same core visit data as Website Visitor Tracker and adds campaign-level interpretation to it. Depending on the provider and the values configured, you can use it to view information such as:
- the campaign provider that redirected the visitor;
- campaign, group, and ad identifiers;
- the type of ad, such as pay per click, banner, feed, email, or affiliate;
- keywords or search terms associated with the ad when they are passed by the provider;
- the context in which the ad was shown, such as search results or another website;
- the match type or relevance relationship between a user’s query and the targeted keyword; and
- the website or distribution source where the ad was found when the traffic did not come from a search result.
The exact set of values depends on the campaign provider and on how much information is supplied in the landing page URL.
What types of ads can be tracked
Campaign Tracker can be used with advertisements and promotional links that send visitors to a URL. Examples include:
- pay-per-click advertising;
- banner advertisements;
- feed-based links;
- email campaigns;
- affiliate links;
- search advertising;
- display advertising; and
- other online ads that use a landing page URL.
The key requirement is that the campaign sends the visitor to a landing page URL that can be generated or adapted for Campaign Tracker.
Current provider notes and outdated terms
Some older campaign documentation and some older interface labels use names that have since changed. The tracking concept is still valid, but the provider terminology should be interpreted using current product names.
- Google AdWords should now be understood as Google Ads.
- Microsoft adCenter and Bing Ads should now be understood as Microsoft Advertising.
- Yahoo! Search Marketing is a legacy product name.
- If older examples mention provider variables, always confirm the current parameter names in the provider’s current documentation before relying on them in a live campaign.
Modern ad platforms also support additional tracking features that may coexist with Campaign Tracker, such as auto-tagging, dynamic URL parameters, and provider-specific URL options. These can be useful, but they should not interfere with the TraceMyIP generated landing page URL or remove the values needed for campaign tracking.
Setup checklist
Use this checklist when creating or troubleshooting a campaign tracker:
- Confirm that your project exists in TraceMyIP.
- Install the Website Visitor Tracker on all site pages, especially the landing pages.
- Create the campaign tracker from the project’s Campaign Tracker area.
- Choose the correct landing page URL and keep it short and valid.
- Fill in the provider and campaign-identifying fields carefully.
- Use variables only when the provider supports them.
- Create the generated URL and test it with Test Link.
- Paste the generated URL into the ad platform’s destination or final URL field.
- Do not place the generated URL into a provider tracking-template field unless your setup specifically requires a different method.
- After the ad goes live, verify that visits appear in Website Visitor Tracker and Campaign Tracker.
If campaign traffic is not appearing as expected, first check the landing page URL, confirm that the visitor tracker is installed on the destination page, and verify that the ad platform is sending visitors to the generated URL without altering it.
🌍 Who visits your website? Sign Up now to find out instantly!