WordPress visitor tracker by TraceMyIP is a plugin specifically developed to provide users with a comprehensive visitor tracking service. The visitor tracker plugin allows WordPress users to take advantage of the advanced features that are not available in standard website statistics services.
📄 🔗 Download the latest version of WordPress UnFiltered Stats plugin. To install, login to WordPress > Add Plugin > Upload Plugin or download from WP plugin directory.
📈 Sign Up now to instantly track website visitors IPs!
What does the WordPress visitor tracker plugin do?
- Individual website visitor IP tracking with human browsing history, all accessed pages, frequency of returning visits, page access statistics over time, etc.
- Visitor activity security monitoring for access abuse, monitoring of password-protected content
- Website visitor bookmarking and tagging
- Long-term security surveillance with visitor activity email notifications
- Access control and protection of individual pages and links
- Protection of website email, contact, and other forms
- Monitoring of ad campaigns and invalid AD clicks monitoring
- Cumulative website visitor statistics with visitor maps
- Provides TWO individual tracking systems:
1. Real-Visitor IP remote SaaS tracking accessible from WordPress dashboard
2. Local UnFiltered Stats that is built into WordPress dashboard.Both systems complement each other.
Read more about the UnFiltered Stats. - Other advanced website visitor statistics functions
STEP 1: Install a WordPress visitor tracker plugin
- Login to your WordPress editor
- Using the WordPress main menu, navigate to [Plugins] => [Add New Plugin]
- Enter TraceMyIP into the plugin [search] input field and hit enter
- Click on the plugin [Install Now] button and then on the [Activate] button
- The plugin should now be installed, activated, and ready to be used
- Alternatively, you can download the latest version from here and then upload the plugin manually to your WordPress installation via step 2.
STEP 2: Generate a visitor tracking code
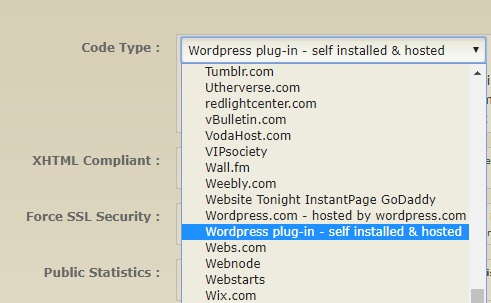 Following the steps below to generate a visitor tracker code, remember to select a “WordPress plug-in – self installed & hosted” type of the code. A JavaScript version of the code would also be compatible
- If you are new to TraceMyIP, create a user account
- If you already have a visitor tracker code, skip to STEP 3
- Login to your TraceMyIP account and click on [My Projects]. If you do not have any projects added or need to track an additional website, click on the [ add a new project ] to generate a visitor tracker code. If you already have a project and need to get a copy of your visitor tracker code, you can recover a visitor tracker code
STEP 3: Configure the WordPress website visitor tracker plugin
- Log in to WordPress. Use the main menu, go to [TraceMyIP] => [Settings]. Scroll down to the [TraceMyIP Settings] section
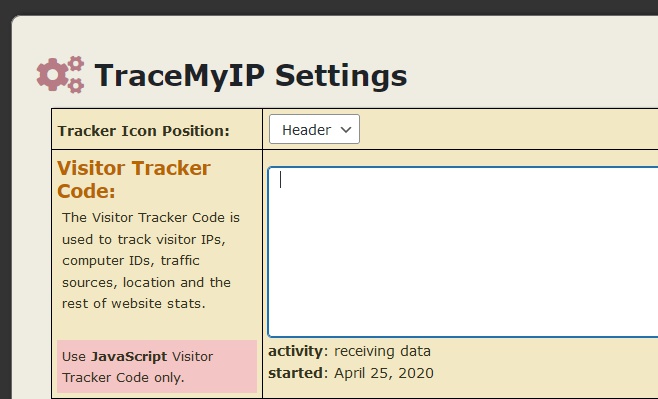 Paste the visitor tracking code into the [Visitor Tracker Code] input box. Choose the “Header” (recommended) or the “Footer” tracker position using the drop-down menu
- Click on the [Update Settings] button at the bottom of the page
- If you are using Cloudflare with Rocket Loader, you would need to deactivate Rocket Loader. Login to your Cloudflare dashboard and go to the Speed tab. Scroll down to “Rocket Loader”, and toggle the feature off to enable real-time visitor tracking. Please note that some website cache plugins can also interfere with tracking and should be disabled.
- Confirm the code installation: the tracker icon should now be visible on ALL pages of your website, including the mobile version. If the tracker icon does not show up on the mobile version of your website, you may need to manually place the same (important!) visitor tracker code in the header of your mobile website template.
- If you need a hidden tracker, using the “Tracker Icon Position” menu set the option to “Header Script“. After that, you can enable an invisible visitor tracking option once you confirm that the tracker shows up on all pages.
Note that when the tracker position is set to “Header Script“, the tracker icon may show up initially in the header or a footer on the left. However, once you enable the invisible tracking option, it will become completely invisible.
- Important!
- Disable any AD blockers in the browser that you are using to test your code installation. The AD blockers can block the tracker from appearing in some instances.
- If you are using any website cache scripts, these may prevent the tracking scripts from being loaded. When your tracker icon does not show up after you have installed the code, try disabling any website page optimization, cache, or JavaScript minification plugins to see where the issue is. Read how to bypass the website cache to enable normal tracking.
- If you are unable to login to TraceMyIP within the WordPress dashboard and are being logged out immediately, ensure that your browser can utilize third-party cookies and at the same time avoid using browser incognito mode.
Alternative Visitor Tracker setup: Using TraceMyIP without a WordPress plugin
If you would like to use TraceMyIP visitor tracking without using a WordPress plugin or use other web editors and publishing tools, you simply need to follow STEP 1 and STEP 2 and then place your visitor tracker code into your website’s header or a footer. Once the code is placed, verify that the tracker icon shows up on ALL pages of your website, which will confirm the tracker installation.
The Page Tracker option for the WordPress plugin
TraceMyIP plugin for WordPress also supports a Page Tracker, which is an additional feature. The WordPress plugin has a separate input box for the Page Tracker code.The Page Tracker is a part of each TraceMyIP project. It allows you to control or block access to your entire website or individual pages. Using website visitor filters, it is possible to create rules for specific visitors or a range of visitors based on their IP address, origin, location, ISP provider, referrer, and other characteristics. These rules can block access, redirect, or send messages to detected visitors.
Setting up Page Tracker
- Login to your TraceMyIP account and click on [My Projects] menu
- Generate a Page Tracker code – click on the [Page Tracker] button from the project menu and follow the steps provided
- Place the code it into the “Page Tracker” input box of the WordPress plugin and hit the [Update Settings] button at the bottom of the page
- Access the Page Tracker feature via the project menu and observe that the page loads are detected at the same time as the Visitor Tracker page loads as seen on [My Projects] page
- Configure the Page Tracker to control visitor access following the visitor IP blocking tutorial
📄 🔗 Download the latest version of WordPress UnFiltered Stats plugin. To install, login to WordPress > Add Plugin > Upload Plugin or download from WP plugin directory.
🌍 Who visits your website? Sign Up now to find out instantly!