Blocking an IP address is a frequently required function that can help web publishers with various scenarios where some type of visitor access control is required. It can also help to limit website abuse and prevent website fraud.
These scenarios can utilize the following TraceMyIP features:
![]()
- Controlling a visitor’s IP access to specific or all pages of a website using a [Page Tracker] feature
- Ignoring specific IPs from being recorded and later reported on website statistics logs using an [block/ignore IP] list feature
Depending on the required action, the software has different functions that can be configured individually to achieve one or another objective. It is important to remember that both functions are not interchangeable. Configuring the [block/ignore IP] function to block IP address visits from being recorded by the web traffic statistics software will not block a visitor from accessing website content.
📈 Sign Up now to instantly track website visitors IPs!
The two different functions of IP access blocking. Block/Ignore an IP or a range of IP addresses.
- Controlling visitor access feature: Any IP address user can be blocked from accessing a website, certain pages or files, shown a custom message for visits, or redirected to another URL. This method allows for full control of a visitor’s access to your website.
- Ignoring an IP activity: The visitor tracking engine can be configured to block an IP address from being captured by the statistics software while allowing the website visitors to access the content. This method simply instructs TraceMyIP to IGNORE the visits from specific IPs to save the log space or filter unimportant visits data. There is also an option to configure the visitor tracking engine to ignore a range of IP addresses that belong to a specific country or a group of countries.
Blocking a user device with a specific IP address or a group of IP addresses based on device’s IP location or other IP data is an advanced feature that TraceMyIP offers to its users. In order to block IP addresses from accessing a website, a website publisher needs to
- Register a TraceMyIP account (STEP 1)
- Install a JavaScript visitor tracker code to track the visitors (STEP 2)
- Install a Page Tracker code to control visitor access (STEP 3)
- Confirm installation of Visitor Tracker and Page Tracker (STEP 4)
- Configure the Page Tracker to block or control an IP address user access (STEP 5)
If an IP address only needs to be ignored/blocked from being recorded by the Visitor Tracker while providing website visitors complete access to a website, then only a Visitor Tracker code needs to be installed.
STEP 1 – Creating a TraceMyIP user account
![]()
First, create a user account to track and control website access. You can pick a FREE* or a Premium Level account to be able to use an IP blocking feature.
* Note that the FREE accounts have limited access to IP-blocking features. Once you have registered and confirmed your account, you can continue setting up your visitor tracker and visitor access control features.
STEP 2 – Creating a Visitor Tracker code
The “Visitor Tracker” code allows for capturing your website visitors’ information and at the same time controlling your visitor’s permissions to access your website content when used together with a “Page Tracker” code. If you already have installed and checked your Visitor Tracker code, you can jump to STEP 3.
To create a Visitor Tracker code, log in to your TraceMyIP account. Navigate to [My Projects] page.
![]()
If you already have added a project for your website but need a copy of the visitor tracker code, click on the “tracker code” link located to the right of the project name and generate a “JavaScript Code“.
If there are no projects on [My Projects] page, you need to create a new project. Click on the [Add New Project] link at the top of the window and follow the screen prompts to create your first project (or if needed an additional project) and follow the on-screen prompts. Make sure to pick a “JavaScript Code” version of the visitor tracker code for your website visitor tracking project.
Once the Visitor Tracker code is generated, copy and paste it into the footer of your website. Ensure that the tracker icon appears on all pages of your website, including your mobile version of the website. Your website may have two different templates for desktop and mobile devices. If you are using a self-hosted version of WordPress, you can install an official TraceMyIP WordPress plugin that has two dedicated input fields for the visitor tracker and the page tracker codes.
When the Visitor Tracker code installation has been confirmed and if you need a hidden icon tracking icon option, you can enable an invisible visitor tracking feature.
STEP 3 – Creating a Page Tracker code
The Page Tracker code allows analyzing the data captured by the Visitor Tracker code and execute IP blocking, IP user redirection, and one-way messaging rules. The rules can be applied to a specific IP or a set of IPs that have a common denominator, such as the location, ISP provider, device type, etc.
There are a significant number of options for configuring a “Page Tracker” to perform different tasks that can be applied to any number of IP addresses. The Page Tracker feature also has its own built-in statistics engine that can show various information about page tracker functions over time, the number of actions taken against specific IPs, the number of blocked or redirected visits, and the status of IP filters that affected each visitor IP (such as time, GEO or IP match).
![]()
To generate a Page Tracker code, navigate to [My Projects] page. Click on the “Page Tracker” button using your project’s MENU. If the “Page Tracker” button is not present in your project’s MENU – ensure that you have installed a JavaScript version of your Visitor Tracker code (as instructed in STEP 2) and that the tracker has captured at least 2 visits. The “Page Tracker” option will only appear when a JavaScript version of the tracker has been used.
![]()
If this is your first Page Tracker installation, read the introductory information on the Page Tracker page, then scroll down and click on the “Add a NEW Page Tracker” link at the bottom of the page. This will take you to the next screen where you can select a type of Page Tracker:
- If you need the simplest and the fastest installation method, select an “HTML Version” of the Page Tracker. The HTML version does not require the installation of an additional PHP file on your website and will instantly work after you install the Page Tracker above the Visitor Tracker code.
- Next, name your Page Tracker. You could name it, for example, “Website IP blocking”.
- Click on the “Create” button to generate the code
On the next page, you will be provided with three different versions of the Page Tracker code that are compatible with different types of web publishing languages. The most common type is a JavaScript Version of a Page Tracker Code. It is compatible with most website publishing software packages. Copy and paste the code into the header of your website. Make sure it’s positioned ABOVE your website visitor tracker code. When a Page Tracker code is installed, it will not create any additional visual elements on your website and will remain as a hidden element.
📈 Sign Up now to instantly track website visitors IPs!
STEP 4 – Confirming your Visitor Tracker and a Page Tracker code installation
After you have installed both the “Visitor Tracker” and a “Page Tracker” code snippets (the Page Tracker code must be installed above the Visitor Tracker code), check that both elements work. In order to check the installation, verify that the pageloads are properly detected by both trackers:
- Checking the Visitor Tracker: Your visitor tracker icon must appear on all pages of the website in order to work properly. You can always make it invisible later at any time by using an “invisible tracker” function. To check the visitor tracker, navigate to “My Projects” page and check that the website visits are being logged by the Visitor Tracker code that you have installed
- Checking the Page Tracker: Navigate to “My Projects” page and click on the “Page Tracker” button link using your project’s statistics MENU. The Page Tracker page will show its own statistics table where the page views should be detected at the same time as your visitor tracker page views
STEP 5 – Blocking an IP address with a Page Tracker
The guide below demonstrates how to set up the access rules for the Page Tracker function. It is also applicable to the Link Tracker, which you can use for specific links on your site and uses the same access rules configuration.
Let’s take a look at an example on how to block an IP address from accessing your website content.
1. Navigate to “My Projects” page and click on the “Page Tracker” button using the project menu. A “Page Tracker Summary” screen will be displayed. If there is any website activity, it will be shown in the statistics table.
2. To set up IP blocking, click on the “setup” link located under the “activity” column. This will take you to the “Page Tracker Access Rules” page.
![]()
Click on the “Configure” button under the “ADVANCED Rules Configuration“. (Note that there’s also a STANDARD rules configuration option, however, it is not as flexible as the ADVANCED version).
3. Next, click on the “Add a New Advanced Rule” link on the right. You will see a rule configuration screen on the left.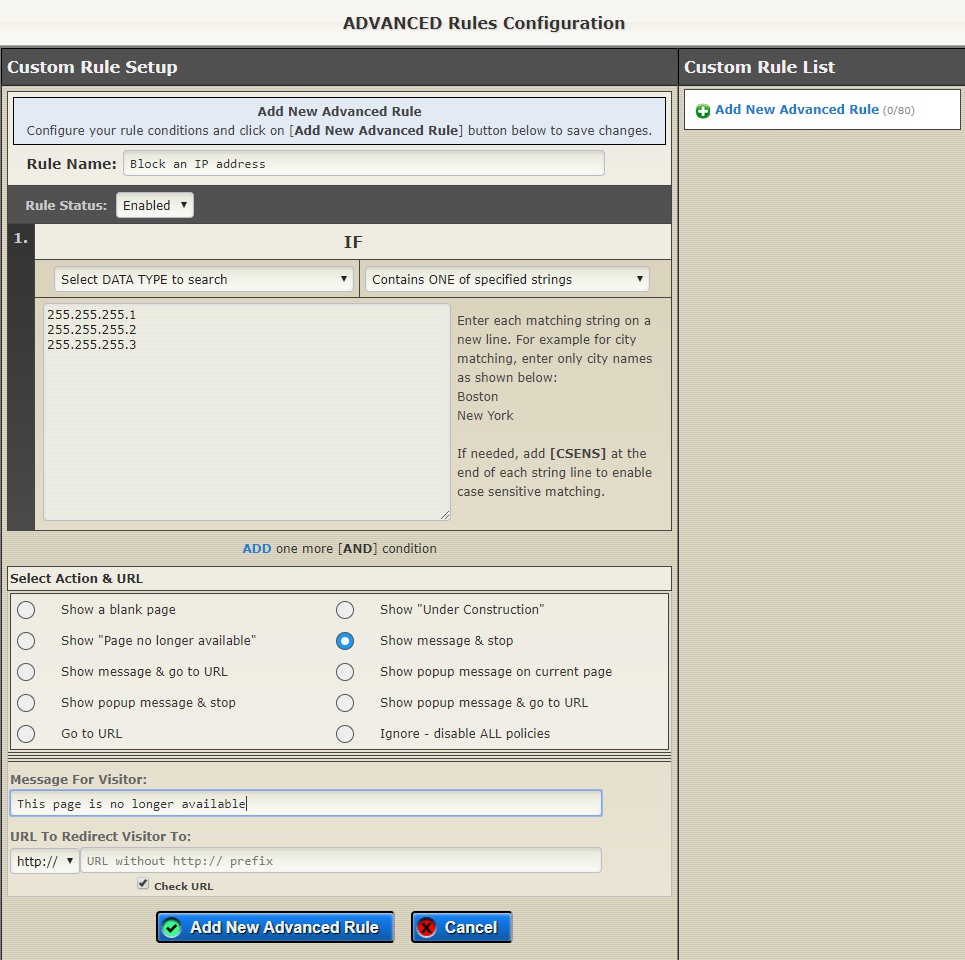
- Enter each IP address (that needs to be blocked from accessing your website content) on a new line as shown on the image.
- Under the “Select Action & URL” section below, select which action would you like to perform when the listed IPs are detected. In this example rule, a “Show message & stop” action is selected.
- Enter your message to the IP address under the “Message For Visitor” section (leave the “URL To Redirect Visitor To” blank).
- Click on the “Add a New Advanced Rule” at the bottom of the page to create and save your IP blocking rule.
This step concludes an IP blocking rule configuration.
Additional Page Tracker visitor blocking, redirecting and one-way messaging options
Page Tracker is capable of other methods of advanced control over your website visitors’ content browsing capabilities. You can not only affect visitors individually by an IP address but let the system detect IPs that belong to different groups, such as IP location by country, state, city, device type, operating system, ISP provider, and so on. You can select WHICH IP property you would like to affect by using the “Select DATA TYPE to search” drop-down menu as shown on the image.
Example: Block IPs by Country
For example, you can block, redirect, and show custom messages to any IP that belongs to a specific country or a set of countries (refer to the image for the setup scenario).
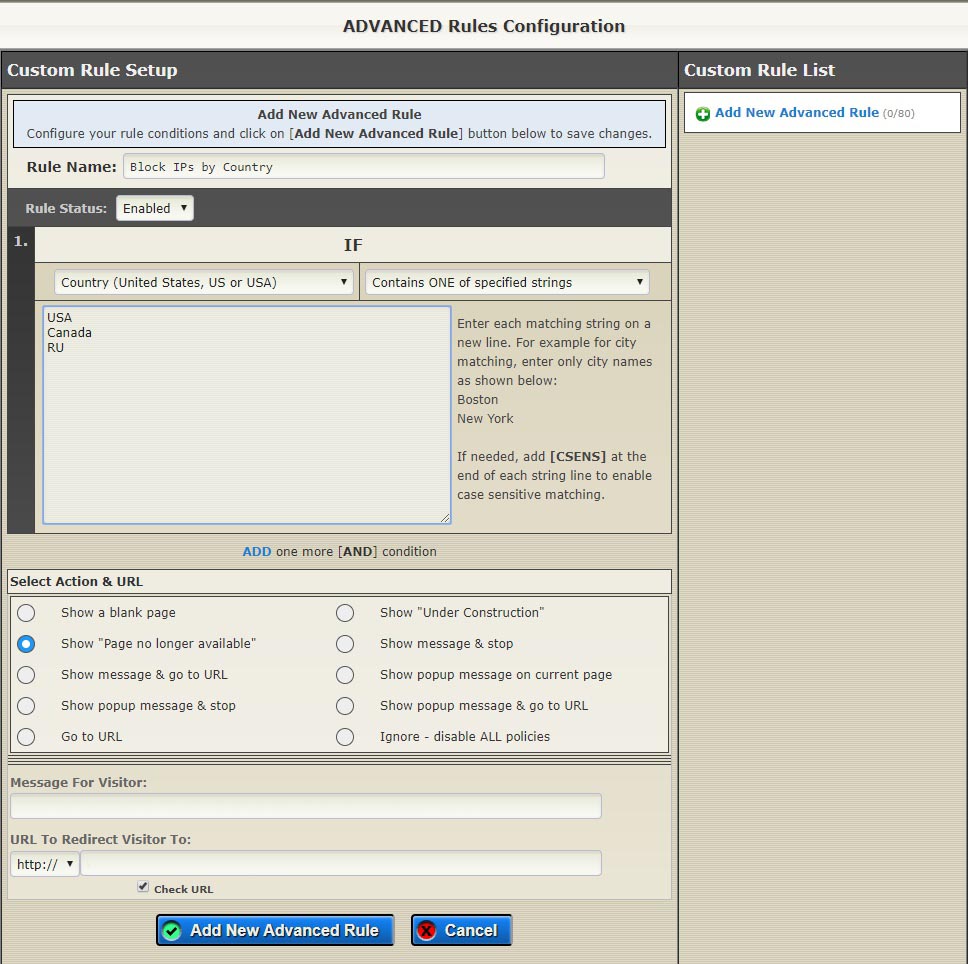 Select the “Country” option from the “Select DATA TYPE to search” drop-down menu and enter each country on its own new line such as shown in the image. You can enter each country in any format, such as the United States, USA, or US.
Next, configure how would you like to affect the visitors that belong to the countries you have selected.
You can repeat the same procedure for setting up your IP blocking rules for other IP types such as blocking by a state, city, device specifications, an ISP provider or organization, referrer URL, landing page, and number of page visits after which the rule becomes active, etc.
🌍 Who visits your website? Sign Up now to find out instantly!