Website visitor alerts and notifications contain a set of the following configurable features:
- Tag specific IPs or machine IDs of visitors and manually assign a name, physical location, and personal information. This helps to immediately identify tagged visitors on the reports and as soon as a tagged visitor returns to the website
- Schedule email alerts. The alerts are sent using a defined notification frequency. For example, the tagged visitors’ history is first logged and then the log is emailed to you either daily, weekly or monthly
- Set up immediate email alerts. These instant email alerts are sent when a visit of a specific person is detected
- Setup visual tracking console notifications that produce either popups or inline notification notes that appear while you browse your visitor tracking reports. These visual console notifications can be combined with email alerts to receive an email copy of all alerts that have occurred
📈 Sign Up now to instantly track website visitors IPs!
Setting up email alerts and visual console notifications
Setting up an alert requires tagging a visitor’s IP address. Tagging creates an internal visitor ID to which all alerts and notifications are assigned. When you create an alert, the system will automatically tag a visitor IP address.
To create a visitor alert and set up notifications:
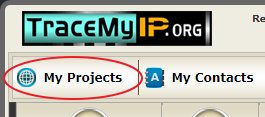
- Navigate to My Projects
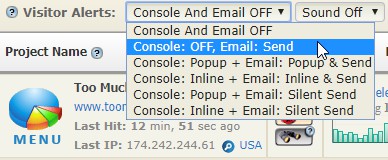
- Using the Visitor Alerts drop-down menu, enable email alerts by selecting [Email: Send] from the drop-down menu. If you would like the alerts to be simultaneously disabled on your reports, you can use other options that also enable the [Email] function, such as [Email: Popup & Send]
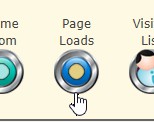
- Using the main project’s menu, click on the [Page Loads] button or any other report that shows individual visitor IPs, such as [Visitor List] or [Came From]
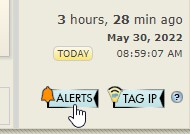
- Select any log entry with an IP address of a visitor that you would like to receive alerts for and click on the [ALERTS] button
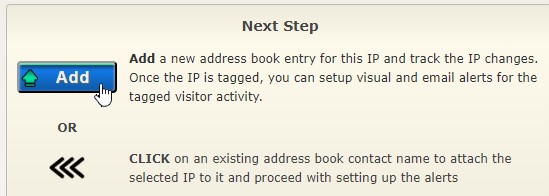
- On the next screen, you have 2 options:
1. If the selected IP has never been tagged before, click on the ADD button, to create an address book entry that will contain the visitor’s name or an ID
2. If you already have an address book entry that you can assign to the selected IP address, click on the address book entry name
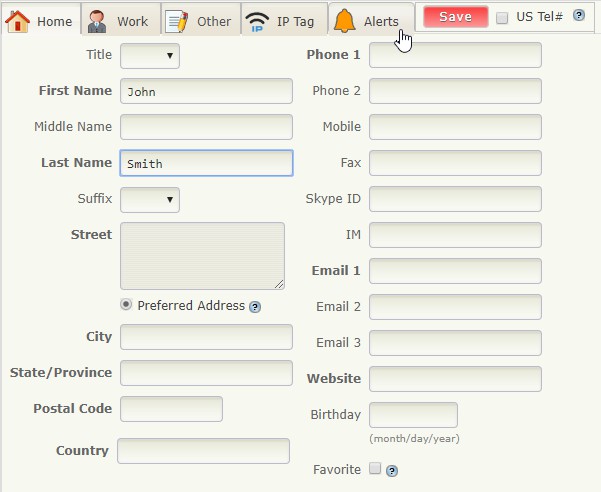
- While creating a tracking address book entry, enter the visitor’s name or any call sign. Then click on the [ALERTS] tab
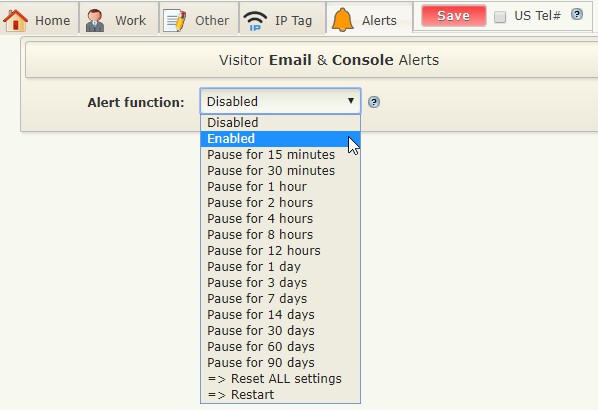
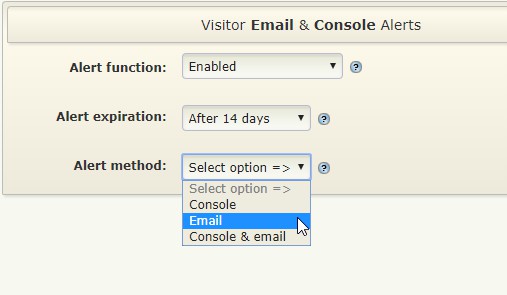
- On the Visitor Email & Console Alerts screen, using the Alert function drop-down menu select [Enabled]. The Pause options are used to pause alerts for a defined period of time.
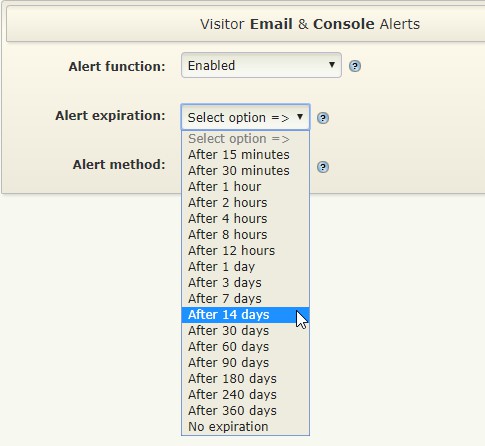
- Using the Alerts Expiration drop-down menu, select a timeframe after which the alerts will be paused. If for example, you would like to receive an alert if one of your visitors returns within 2 weeks after setting up an alert, select [14 days] from the menu. If the person does not revisit your pages within 14 days, then this alert will be deactivated.
- Next, select the [Email] option from the Alert Method drop-down menu. If you also would like to see console alerts while browsing your reports, you can choose the appropriate option from the drop-down menu
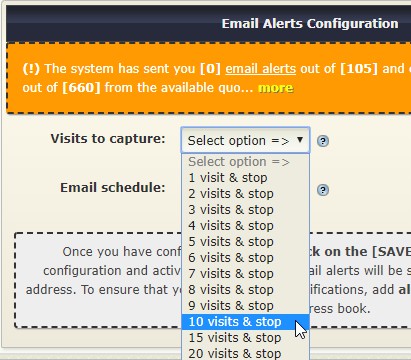
- In the Email Alerts Configuration section use the Visits to capture drop-down menu to specify after how many detected visits, you would like to stop receiving visitor email notifications
- The Email schedule drop-down menu has 4 flexible options, which can be used to deliver visitor email alerts at specified intervals and time of a day, a week, or a month.
1. Immediate email alerts will instantly deliver an email alert of the first detected visit by a specific person and then will send additional notifications of consequent visits every X number of hours or days.
Note that an immediate email alert does not send email notifications for each pageload. It sends an email alert for each visit. A visit is considered a pageload that occurred an hour after the last visitor’s pageload was detected. Sending alerts for each pageload is not an option since your mailbox would get flooded with alerts and the email storage would be depleted in a very short period of time (depending on the visitor’s activity)
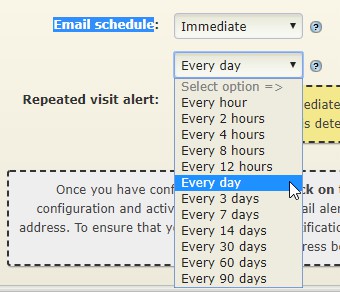
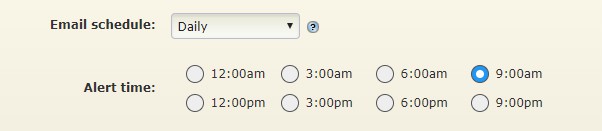
2. Daily email alerts will send a summary of visits that have occurred within the last 24 hours at a specific hour of a day
3. Weekly email alerts allow sending visit notifications by email on a specified day of the week, such as Monday, Tuesday, Wednesday, Thursday, Friday, Saturday, or Sunday. The alert time can be set to a specific hour of a day
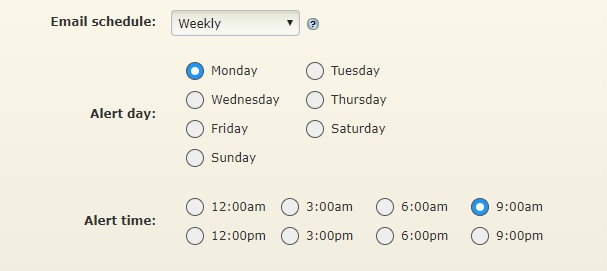
4. Monthly email notifications can be set to increments in 5 days, such as the 1st, 5th, 10th, 15th, 20th, 25th, and the last day of a month. The hourly timeframe is set in increments of 3 hours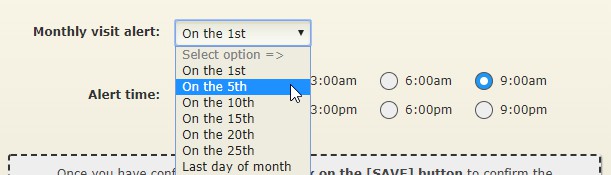
- Once the settings have been set, click on the SAVE button at the top of the configuration screen
Please note that we do not suggest enabling a “Cookieless Tracking” option for the project that you use with email alerts, since it may affect how your email notifications are sent.
If at any time you would like to completely disable or pause any visitor alert or all existing email alerts, you can use the Alert function drop-down menu.
🌍 Who visits your website? Sign Up now to find out instantly!